(310) 620-1675
Categories
repair

How To Clear A Clogged Drain With Standing Water

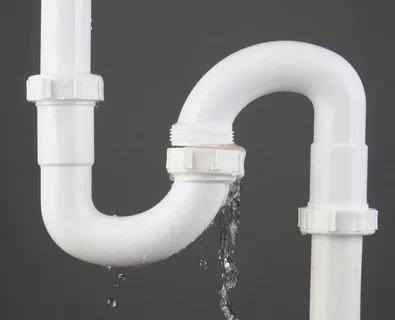
There are a few enemies everyone with a bathroom has in common. One of the more notable is the dark, smelly standing water that may not leave our tubs. But, as is true with villains- there is always an origin story. And in this case, you should search “How to clear a clogged drain with standing water” to get your answers. After all, no one wants to be caught up with past problems that can result in increased damage to your drainage system, a wrecked bathroom, etc.

So, in this article, we will dive deeper into the steps you can take to ensure that a clogged drain is not a daunting event in your household. There are a few steps you can take and some preventative measures to keep in mind for the future!

Why Standing Water Needs To Be Dealt With?

Let’s get into the importance of avoiding this tell-tale sign of a clogged drain. Although it seems like a no-brainer it is best to note; standing water is infected with bacteria. It is a playground for all sorts of microorganisms to grow. This will start with an odour coming from the water, which will pollute the air. If your loved ones have respiratory sensitivities- their reactions are a sign the problem has elevated. And this growth may be quick on the part of the bacteria; depending on the temperature of your residence it can be as quick as a couple of hours.

Of course, if the water is still not dealt with, it will attract all sorts of insects. These may include mosquitos and hazardous flies. Also, as household bathrooms are not large spaces, this infestation spreading will not be difficult.

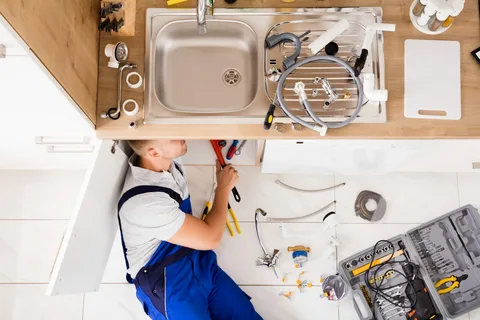
Tools Needed To Address The Problem. 

Apart from a couple of specific needs, your household cleaning supplies can be your weapons of choice. The only part which you must take care of is covering your skin before dealing with the mess. You will be required to plunge into the standing water to open up the drain; this risks skin irritation. So, your first order of business is to dawn on protective tools like long-sleeved rubber gloves. Also, if the water’s odour is an issue, you should be ready with a good-quality mask.

Additionally, you may need the following: 

  • A plunger
  • A bucket
  • A wire coat hanger
  • Boiling water and cold tap water from your sink

Try To Prepare Before The Procedure.

Before we begin the actual process, you should be able to clear out as much water as possible without the use of chemicals. It is also advisable to use a few cleaning chemicals because they can erode/weaken the pipes. Still, using a bucket take out as much standing water as needed- you should sicard this outside. Then, take away any drain covers and wipe down standing water around the drain. After this, you may clean out any visible gunk and throw it away in the trash. Again, this physical contact is the reason why you should be wearing gloves to protect yourself from bacteria. 

But now, you should be ready to thoroughly unclog the drain. You may research any home remedies for natural chemical cleaners. Or you may research sites of pipe cleaning services and analyze any tips and tricks they recommend.

A Few Ways To Clean The Drain With Household Tools.

We will talk about the tried and tested way of clearing out this mess- with a strong, unwound coat hanger! You must bend the hanger until it forms a “J” shaped curve. Send this down the drain until you feel resistance- that is the culprit. Then, use the hook to pull out this gunk and set it aside. You can repeat these steps as many times as needed. Or, you may use a plunger. In this case, remember to apply petroleum jelly on the inner rim of the tool. Then, place it right on top of the drain fast and pull back. This suction should steadily bring up the clog within the pipe. However, its efficiency can depend on how big the mess is. 

In both cases, you can test whether your drain is clog-free by running it down with hot water for three minutes and then, cold water for two minutes. If the water is freely flowing down, the mission has been successful. If not- it is time to move on to the next remedy.

Final Thoughts. 

Keeping the points above in mind, you should have greater confidence in facing this age-old problem. It is also advisable to avoid excessive hair falling into the drain- perhaps with the use of a shower cap. Additionally, taking away kids’ toys that could fall into the bathtub’s drain and allowing hot water to run after every shower or bath can be good ways to prevent this problem!

Categories
repair

Explore How Does Plumbing Work in House With Some Amazing Tricks!

The plumbing system in your house may appear to be a complex web of pipes and routes with many purposes and somehow it is. Furthermore, the natural reaction of the ignorant when something unavoidably goes wrong is to panic and contact experts. If you can’t distinguish between your wastewater and supply lines, this is a smart decision. But until someone comes to your aid, what will you do? If you don’t know what went wrong in the first place, how will you stop something similar from happening again? This article contains extremely basic information that could prevent flooding in your home so it’s worth reading.

A clear description of your home’s plumbing systems without any nonsense or disorganized pictures with arrows pointing in all directions. To answer the question, “How does plumbing work in house?” we will investigate the ins and outs of the two subsystems that bring fresh water into your home and remove wastewater. Now let’s get started!

How does Plumbing operate?

This system often uses the shared pipeline that runs beneath your street to supply fresh water to your home. Water is first routed through a meter to determine how much is used, and then it is delivered to all of the appliances in your home that need it. Water pipes can have a diameter of.5 inches to more than 4 inches, depending on the fixture. They are usually composed of plastic, copper, or galvanized iron. The only thing that will allow the water in supply pipes to defy gravity is the high pressure at which they frequently operate since they must transport water upwards and around corners.

Sometimes, pipes might burst due to high pressure. You must be aware of the location of the primary stop valve in case this occurs. This valve, which is typically near the meter, allows you to turn off the water supply to your entire home. To avoid flooding in the event of a plumbing problem, take immediate action. You might not want to turn everything off and leave your house without a flushing toilet if you’re certain the problem is limited to a single fixture, like a leaking shower. This is especially true if you can’t get a plumber out right immediately! You should be able to turn off the water to the broken shower and still be able to see the filthy dishes soaking in the sink because most indoor fixtures come with distinct stop valves.

A key fact:

It is that if you want a cool drink straight from the tap, water from the mains supply is readily available. However, there needs to be an extra step if you want hot water for scouring or showering, for example. Your heater receives cold water via a pipe that emerges from the central system. The hot water line distributes warm water wherever it is needed from the heater. A residential water heater’s usual temperature range is 140 to 160 degrees Fahrenheit. Water that has been heated to 120 degrees Fahrenheit can power most equipment.

Let’s examine how the drainage system, which is the other plumbing system, functions to remove wastewater from the area.
Either a poisoned tank or a sewage treatment facility will receive the wastewater that exits your house. If everything is functioning well, there isn’t much of a difference between the two, but it’s important to know which one your system uses in case you run into any issues. Your drainage system moves without pressure, in contrast to the supply system. Every drainage pipe descends, allowing wastewater to be drawn away by gravity. The municipal sewage line also descends to the disposal site.

Now that you know the general direction your trash is going, let’s get a little more technical. Merely a tiny bit! Vents, traps, and cleanouts are components of drainage systems that are necessary for the secure disposal of sewage. The openings that protrude from your roof are vents, which let air into the pipes. This is crucial because wastewater would not flow and the water in the traps would require continuous human clearance if there was no air supply. I know, gross. With sufficient effort water flows out of the sink and out of the pipe and through the trap. The tube’s shape does retain some back. This tiny water accumulation keeps sewage gasses from seeping into your kitchen.

How Bridges Function in Plumbing

The drainage and supply pipelines are a part of several systems. Water from one should never be mixed with water from another. They must enter and exit the same appliances together. While dirty water should flow down and out of the drain, clean water must come out of the faucet. Thus, it is argued that the sink serves as a bridge. Any fixture, or device that removes wastewater and draws in freshwater, has the potential to function as a bridge. That means your dishwasher, shower, sink, and toilet are all bridges.

Conclusion:

Plumbing systems are essential to every building because they ensure the safe disposal of wastewater and the delivery of clean water. Plumbing is the system of fittings and pipes that are put in a structure to distribute and use drinkable water. It also removes trash that is contaminated by water. It is notable from sewage and water systems that supply a city or a collection of buildings. In case of severe leakage, it is very complex to fix your plumbing system on your own so it is best to hire a professional to get it fixed.

Categories
repair

How to Repair a Leaking PVC Pipe?

If you work with PVC, chances are you will find yourself in a situation where you need to fix a leaky PVC pipe. You may have asked yourself how you could fix a leaky PVC pipe without cutting it? There are many ways you can go about fixing a leaky PVC pipe. Four temporary solutions to repair a leaking PVC pipe are to cover it with silicone and rubber repair tape, wrap it with rubber and secure with hose clamp, bond it with repair epoxy, and cover it with fiberglass wrap. Keep reading to find out more about these leaky pipe solutions.

Repair a PVC Leak with Silicone and Rubber Repair Tape

Rubber and silicone repair tape is a simple solution if you’re dealing with a minor leak. Rubber and silicone tape comes in a roll that you can wrap directly around the PVC pipe. The repair tape adheres directly to itself rather than adhering to the PVC pipe. Identify the leak, then wrap the tape around the leak covering a little bit to the left and a little bit to the right of the leak so that the entire leak area is covered. The tape uses compression to fix the leak, so you want to make sure your wrap is tight and secure. Before putting away your tools, observe your repair to ensure the leak has been fixed.

Secure the Leak with Rubber & Hose Clamps

Some pipe repairs are meant to only be temporary fixes for small leaks. One such solution is using rubber tape and hose clamps. As the leak grows, this repair will become less effective but it is a great temporary fix while gathering materials for a more permanent solution. For this repair, find the damaged area, wrap rubber around that area, place the hose clamps around the damaged area, then tighten the hose clamps around the rubber to stop the leak.

Use Repair Epoxy for PVC Pipe and PVC Pipe Joint Leaks

Repair epoxy can be used to repair leaks on PVC pipe and PVC pipe joints. Repair epoxy is a viscous liquid or putty. Follow the manufacturer’s directions for preparing the putty or liquid epoxy before beginning.

To repair your PVC pipe or joint leak, clean and dry the damaged area ensuring that water or other liquids cannot reach the affected area because this could compromise the repair. Now, apply the epoxy to the damaged pipe or PVC joint according to the manufacturer’s instructions and let it cure for 10 minutes. Once the curing time period has elapsed, let water move through the pipe and check for any leaks.

Cover the Leak with Fiberglass Wrap

There are two types of fiberglass wrap solutions. The first solution is fiberglass resin tape. Fiberglass tape works by using a water activated resin that hardens around the pipe to slow the leak. While fiberglass tape can repair the leak, it is still a temporary solution. To make the repair using fiberglass resin tape, clean around the leak on the pipe using a damp cloth. While the pipe is still wet, wrap the fiberglass tape around the damaged area and let the resin harden for 15 minutes.

The second solution is a fiberglass resin cloth. The fiberglass resin cloth can be used for a more permanent solution, but it is still a temporary repair. Before using the fiberglass cloth, clean the pipe around the leak, then lightly sand the surface. Lightly sanding the surface will create a more adhesive surface for the cloth. Now the fiberglass resin cloth can be placed over the leak. Finally, shine a UV light directly onto the pipe, this will begin the curing process. After about 15 minutes, the curing process should be complete. At this time, you can test your repair.

Leaky PVC Pipe Repaired

The best solution for how to repair a leaky PVC pipe or PVC pipe joint is always to replace the pipe or the fitting. If you are in a situation where a complete repair is not an option or you’re waiting on parts to arrive using silicone or rubber tape, rubber with hose clamps, repair epoxy, or fiberglass wrap are all great temporary solutions for repairing a PVC pipe leak. To prevent unforeseen damage, if it’s possible to shut off the water until a full repair can be made, we recommend leaving the water off. With so many options for fixing a leaking PVC pipe without cutting, you’ll be able to quickly repair any problem areas.